
Pro · My Garment Wizardbeta
The blank your shop actually sells, in your designer in three minutes.
Two photos of your blank in one end. A garment your customers can recolor, print on and order out the other.
Why it exists
Every garment list stops somewhere
Every designer on the market ships with a garment list, and every one of them stops somewhere. Mine stops at fourteen. If your shop runs Bella 3001s and Comfort Colors, you’re covered. If your best seller is something your supplier stocks and nobody built a template for, you’ve got two choices: don’t sell it online, or open a photo editor and spend an afternoon masking a shirt.
I’ve done the afternoon. More than once. That’s why the wizard exists.
The whole thing
Six steps, start to finish
Give it a front photo and a back photo of the blank, any photos you have the rights to use: your supplier’s asset kit or your own shots. Six steps later there’s a garment your customers can recolor, print on and order, sitting in your designer next to the built-in ones.
Photos in
Front and back. Shoot the lightest colored shirt you own, not a white one. It paints every color off that one photo, and white gives it no shading to read.
Make the blank look real
Plain-language sliders, shadow depth through edge trim, and the preview moves as you drag. You’re matching your eye, not learning a tool.
Draw the print zones
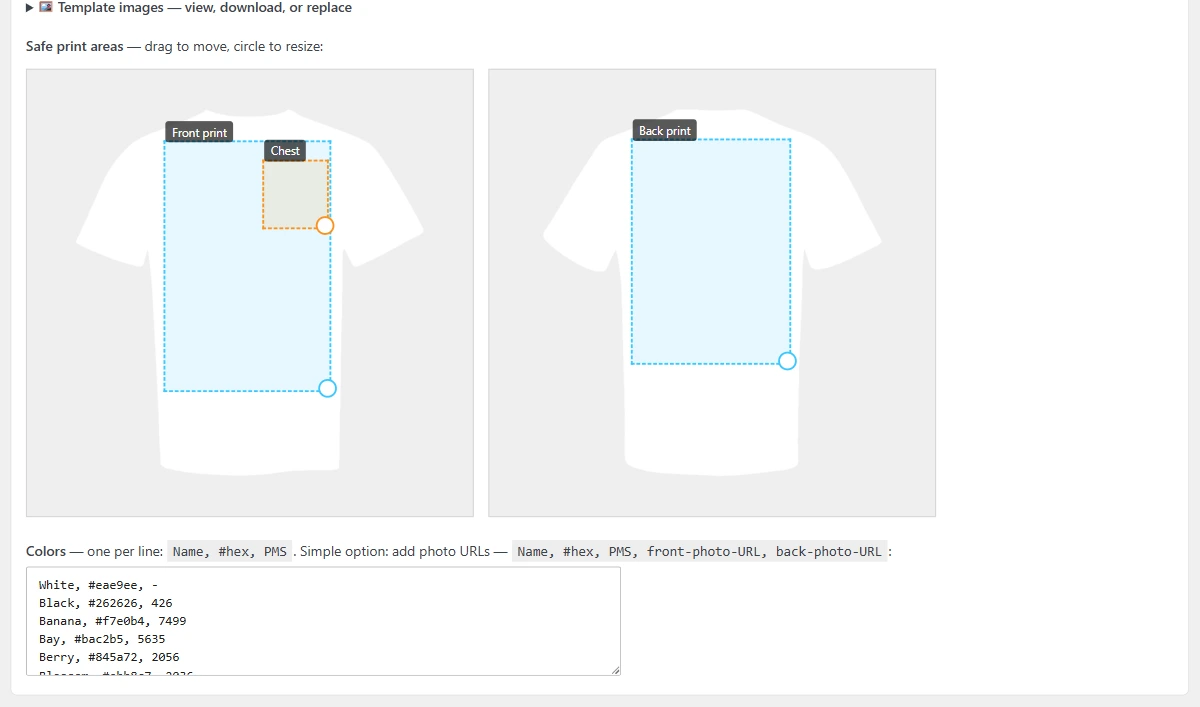
One box over the printable area, one over the chest logo spot. That’s the safe zone your customers can’t design outside of.
Paste your color chart
Name, hex, PMS, straight off the supplier’s sheet. I pasted in 96 colors and it took one click.
Add heather, or skip it
One photo and a texture slider gets Heather, Antique, Ash and Sport Grey behaving like real fabric instead of flat gray.
Name it and save
It writes every image to your Media Library, and the garment turns up in the designer, in Garments & Colors, and in the WooCommerce product dropdown. Nothing else to wire up.
If you’d rather do it by hand
The manual route is right beside it
The wizard gets you a garment that sells. If you know your way around a photo editor and you want every mask exactly where you’d put it, the Advanced Garment Maker is one click away: same garment, full manual control. Most shops never open it. It’s there when you want it.
The step-by-step for both, including what to do after a garment is saved, is in the garment wizard documentation.
What it costs
It’s in Pro, and I don’t charge per garment
The garment wizard is Pro. That’s $299 a year, or $899 once and it’s yours. Pro is also where the premium retail blanks live (Bella 3001, the CVC blends, the Comfort Colors 1717), so you’ve got fourteen garments built in before you add a single one of your own.
I don’t charge per garment you build. Build one or build twenty.
Try it in the live demo See plans and pricing
Not affiliated with or endorsed by any garment manufacturer. All trademarks are the property of their respective owners.